Week 2 Practical - Laser Cutting
During the practical, we learnt more about the use of laser cutting and the operating procedures. We then write down all the steps in our improved SOP. Here is our team's improved SOP.
Start up of the laser cutter
Turn on Air compressor (Red Switch) (Skip for fusion Pro)
Turn on the fume extractor. (Green Switch)
Turn on the laser cutting machine (Black Switch)
Turn on the PC
Operation of Corel draw
Open CorelDraw on the computer
Import desired BMP, PNG, JPEG, DXF file or SVG file into CorelDraw
Click on the cursor tool on the left panel and select desired line/shape


4. Change the colors of line/shape to desired operation
(Red=vector / Green=engraving)

Send the imported file to print (Ctrl-P) then press print.

Operation of epilog dashboard
1. On the Epilog Dashboard, choose Autofocus:Thickness (Pro) / On (M2) on the top of the right panel

2. Turn on Air Assist on the bottom of the right panel

3. Load Material Library to choose what material is being cut/ engraved

4. Add final adjustments to the materials position and the speed/power/frequency desired. Check with the personnel in charge if unsure
(For both machines, position the object to cut at the top left corner so that the laser need not move too far to start cutting)
(For both machines, position the object to cut at the top left corner so that the laser need not move too far to start cutting)
5. Press the print button
Operation of 3D printer
- Check the file’s name and estimated time to cut on the LED Touch screen(Pro) /

2. Once printed, wait for at least 30 seconds for all the fumes to be extracted.

Shut down of laser cutter
Clear all material from inside the laser cutter
Turn off the laser cutter
Turn off the fume extractor
Turn off the air compressor
Shut down PC
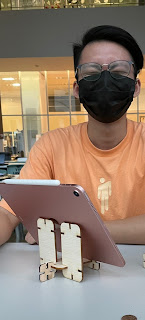
Here are the pieces we print:
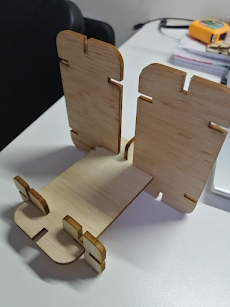 |
| Phone/IPad stand |
Reflection:
In this practical, we learnt how to perform laser cutting using either the Fusion Pro and Fusion M2. We were first tested on the competency assessment and we realised that our SOP was not detailed, but thanks to Mr Chan and supervisors, we were able to operate the machine. Next when we were going to do all the pieces, we realised that all the pieces were not a perfect fit due to kerfing, so we went back and tried to redraw all the pieces on Fusion360. However, due to some technical difficulties faced in our laptops, we had to postpone the cutting. When we came back to FabLab the week after, the wood we used was a different size from what we had the previous week. We then change the parametric measures to change all respective gaps. Within a few minutes, we were able to change all 3 designs to their respective dimensions. We also had to decrease the gap more to take kerf into account. In the end, with the wood thickness of 4mm, we changed the size of the gap from the original 4.5mm to 3.5mm. The pieces also fit perfectly with each other. Initially, we thought that adding parameters was just an extra redundant step, but after needing to make quick changes to the slot width, we realised that it was extremely useful and that it should be incorporated into all of our future designs using auto fusion360. Instead of redesigning all the 3 pieces which will take around 20 mins, we just had to change the parameters for all the designs which took 4 times faster. When we were doing this, we were very appreciative with this function and realised the importance of it. We also had first hand experience on the importance of kerfs as our first attempt did not stick together and all the other groups also had many troubles with it. After looking at other groups' attempts, we discussed and agreed on a gap length that will fit. Because of that, we were able to get a perfect fit on our second attempt. Using the pieces we made from laser cutting, we were able to create a simple yet effective IPad stand design. We join 3 square pieces to a rectangle piece to make the base of the stand and join 2 other rectangle pieces to the structure to create the handphone stand.
No comments:
Post a Comment